首页
视频
资源
登录
原
Kubernetes .Net6 CRD
4346
人阅读
2022/8/10 22:24
总访问:
2971769
评论:
0
收藏:
0
手机
分类:
容器编排
 >#Kubernetes .Net6 CRD [TOC] ## CRD介绍 tn2>简单来说就是自定义资源,像Pod、Service、Deployment一样。 创建自定义资源的资源类型为:`CustomResourceDefinition`。 ## 简单示范 tn2>我们通过一个Demo来进行简单的示例与创建。 编辑`croncustomresource.yaml`文件,内容如下: ```yaml apiVersion: apiextensions.k8s.io/v1 kind: CustomResourceDefinition metadata: # 名字必需与下面的 spec 字段匹配,并且格式为 '<名称的复数形式>.<组名>' name: crontabs.stable.example.com spec: # 组名称,用于 REST API: /apis/<组>/<版本> group: stable.example.com # 列举此 CustomResourceDefinition 所支持的版本 versions: # 版本名称,如v1、v1alpha3等 - name: v1 # 是否启用 served: true # 是否进行存储 storage: true schema: openAPIV3Schema: type: object properties: spec: # 定义spec为object类型的字段 type: object properties: # 定义需要的字段 cronSpec: type: string image: type: string replicas: type: integer # API生效范围,可以是 Namespaced 或 Cluster scope: Namespaced names: # 名称的复数形式,要求全部小写,用于 URL:/apis/<组>/<版本>/<名称的复数形式> plural: crontabs # 名称的单数形式,也要小写,作为命令行使用时和显示时的别名 singular: crontab # kind CRD的资源名称类型 kind: CronTab # 缩写形式的名称,小写。 shortNames: - ct ``` tn2>接着我们来创建该自定义资源。 ```bash kubectl apply -f croncustomresource.yaml ```  tn2>创建一个我们自定义的`CronTab`资源。 ```bash vim cron.yaml ``` ```yaml apiVersion: "stable.example.com/v1" kind: CronTab metadata: name: my-new-cron-object spec: cronSpec: "* * * * */5" image: my-awesome-cron-image replicas: 3 ``` ```bash kubectl apply -f cron.yaml # 查看资源 kubectl get ct ``` 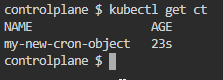 tn2>然后我们可以删除掉我们自定义的资源。 ```bash kubectl delete -f croncustomresource.yaml kubectl get ct ```  tn2>当然我们还可以对指定的字段进行验证值规则,与设计默认值。 举例: 设置`cronSpec`字段值必须为时间规则,默认为`5 0 * * *`。 设置`replicas`字段值必须为1-10区间,且默认值为1; ```yaml cronSpec: type: string pattern: '^(\d+|\*)(/\d+)?(\s+(\d+|\*)(/\d+)?){4}$' default: "5 0 * * *" image: type: string replicas: type: integer minimum: 1 maximum: 10 default: 1 ``` ## Scale 子资源 tn2>从kubernetes 1.11+开始,在CRD的定义中引入了名为`subresources`的配置,可以设置的选项包括status和scale两类。 | 字段 | 描述 | | ------------ | ------------ | | `status` | 启动`/status`路径,其值来自CRD的.status字段,要求CRD控制器能够设置和更新这个字段的值。 | | `scale` | 启动`/scale`路径,支持通过其他Kubernetes控制器(如HorizontalPodAutoscaler控制器)与CRD资源对象实例进行交互。用户通过 `kubectl scale` 命令也能对该CRD资源对象进行扩容或缩容操作,要求CRD本身支持多个副本的形式运行。 | tn2>关于Scale子资源定义了以下字段: | 字段 | 描述 | | ------------ | ------------ | | `specReplicasPath` | 指定我们定义的`.spec.replicas`字段。(必需定义)。`/scale` | | `statusReplicasPath` | 指定我们定义的`.status.replicas`字段。`/status` | | `labelSelectorPath` | 指定我们定义的`.status.labelSelector`字段。`/status` | ```yaml apiVersion: apiextensions.k8s.io/v1 kind: CustomResourceDefinition metadata: name: crontabs.stable.example.com spec: group: stable.example.com versions: - name: v1 served: true storage: true schema: openAPIV3Schema: type: object properties: spec: type: object properties: cronSpec: type: string image: type: string replicas: type: integer status: type: object properties: replicas: type: integer labelSelector: type: string # subresources 描述定制资源的子资源 subresources: # status 启用 status 子资源 status: {} # scale 启用 scale 子资源 scale: # specReplicasPath 定义定制资源中对应 scale.spec.replicas 的 JSON 路径 specReplicasPath: .spec.replicas # statusReplicasPath 定义定制资源中对应 scale.status.replicas 的 JSON 路径 statusReplicasPath: .status.replicas # labelSelectorPath 定义定制资源中对应 scale.status.selector 的 JSON 路径 labelSelectorPath: .status.labelSelector scope: Namespaced names: plural: crontabs singular: crontab kind: CronTab shortNames: - ct ``` tn2>创建自定义资源,与CronTab资源。 ```bash kubectl apply -f croncustomresource.yaml kubectl apply -f cron.yaml kubectl get ct ``` 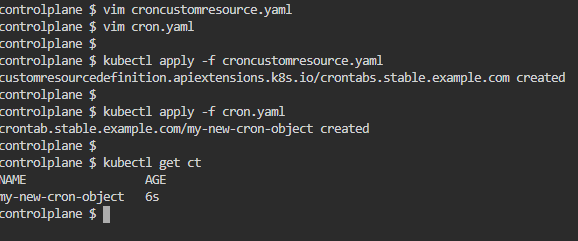 tn2>通过API Endpoint查看资源对象的状态。 ```bash # /apis/<api group 名称>/<版本>/namespaces/<名称空间>/<资源名称>/status curl https://172.30.1.2:6443/apis/stable.example.com/v1/namespaces/default/crontabs/my-new-cron-object/status \ --cacert /etc/kubernetes/pki/ca.crt \ --cert /etc/kubernetes/pki/apiserver-kubelet-client.crt \ --key /etc/kubernetes/pki/apiserver-kubelet-client.key ``` 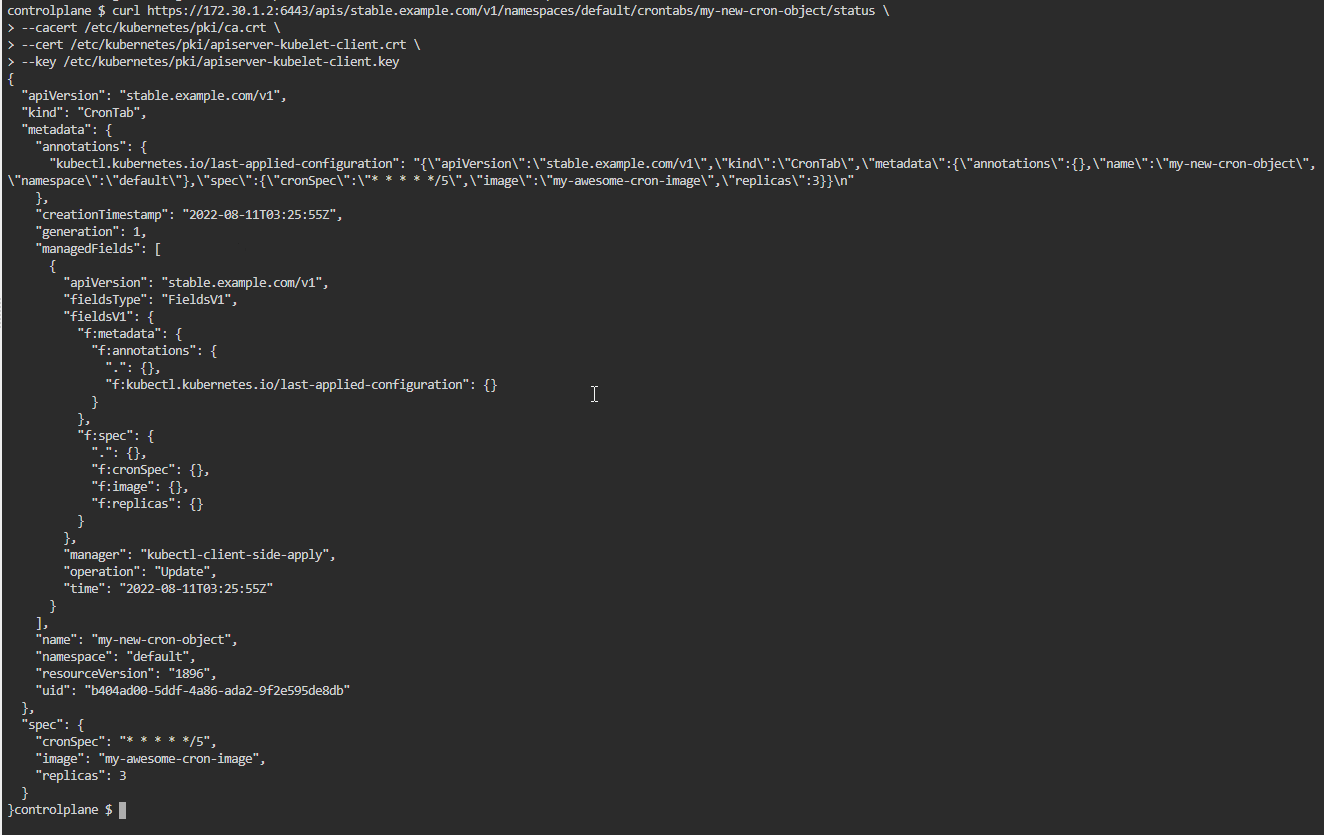 tn2>可通过使用`kubectl scale`命令对Pod的副本数量进行调整。 ```bash # 查看当前副本数 kubectl get ct my-new-cron-object -o yaml | grep "replicas:" # /apis/<api group 名称>/<版本>/namespaces/<名称空间>/<资源名称>/scaled # https://172.30.1.2:6443/apis/stable.example.com/v1/namespaces/default/crontabs/my-new-cron-object/scaled # 设置当前副本数为5 kubectl scale crontab/my-new-cron-object --replicas=5 kubectl get ct my-new-cron-object -o yaml | grep "replicas:" ``` 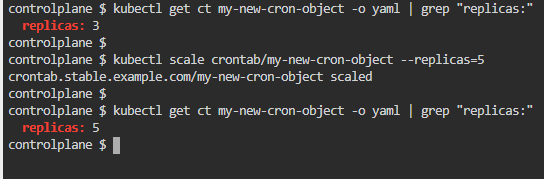 ## 显示多个列 tn2>我们发现这样查看副本数很不方便,我们可以通过在`croncustomresource.yaml`中定义`additionalPrinterColumns`字段。 ```yaml apiVersion: apiextensions.k8s.io/v1 kind: CustomResourceDefinition metadata: name: crontabs.stable.example.com spec: group: stable.example.com versions: - name: v1 served: true storage: true schema: openAPIV3Schema: type: object properties: spec: type: object properties: cronSpec: type: string image: type: string replicas: type: integer status: type: object properties: replicas: type: integer labelSelector: type: string subresources: status: {} scale: specReplicasPath: .spec.replicas statusReplicasPath: .status.replicas labelSelectorPath: .status.labelSelector additionalPrinterColumns: # Spec列显示cronSpec字段 - name: Spec type: string description: The cron spec defining the interval a CronJob is run jsonPath: .spec.cronSpec # Replicas列显示replicas字段 - name: Replicas type: integer description: The number of jobs launched by the CronJob jsonPath: .spec.replicas # Age列显示creationTimestamp时间字段,这个在创建资源的时候会产生 - name: Age type: date jsonPath: .metadata.creationTimestamp scope: Namespaced names: plural: crontabs singular: crontab kind: CronTab shortNames: - ct ``` tn2>更新我们的自定义的CRD资源。 ```bash kubectl apply -f croncustomresource.yaml # 查看ct kubectl get ct ``` 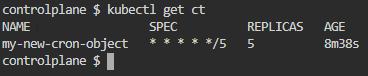 ## .net crd资源的实现 >### 实现目标 tn2>我们想通过CRD定义自己的CSharpApp资源,通过编写代码,直接让其执行。 具体请查看下图所示: 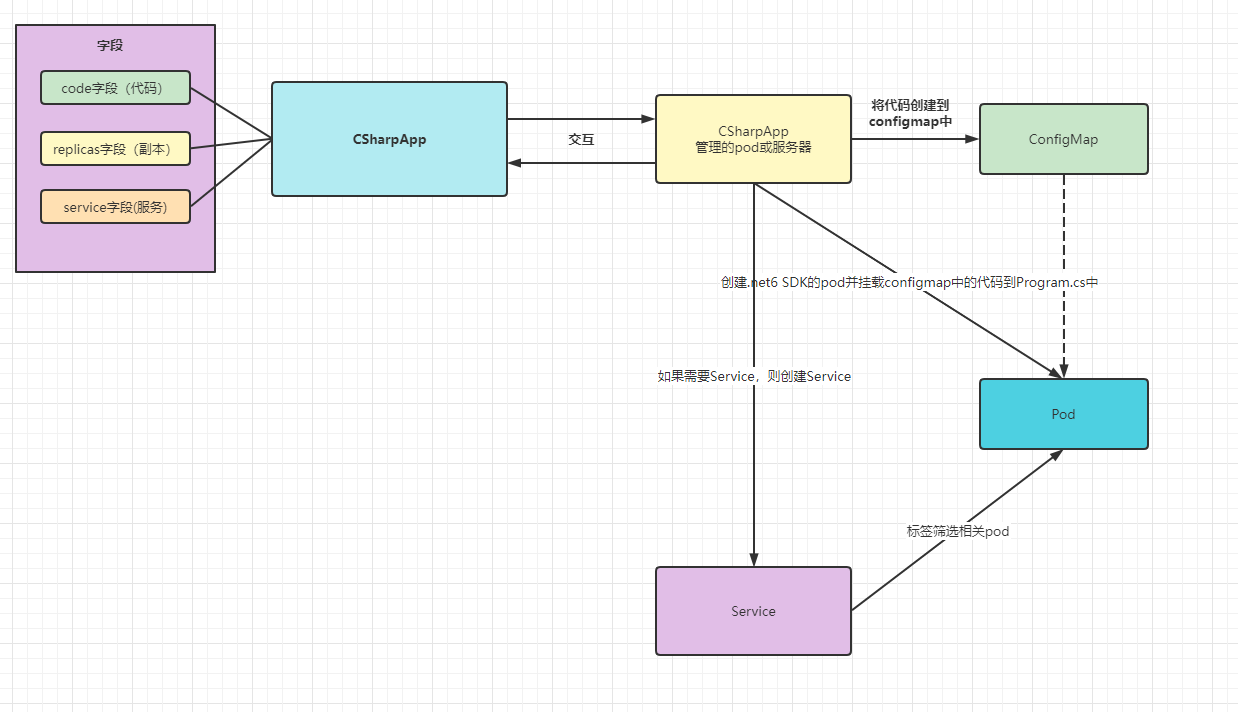 tn2>关于管理CSharpApp资源的服务器我们可以运行在本地,也可以运行在服务器上。总之它有管理的权限就可以了,kubeconfig啊、ServiceAccount...等 这是Common sense。 那我们管理CSharpApp资源的服务器通过监控自定义资源的事件来做不同的操作。代码的架构如下: 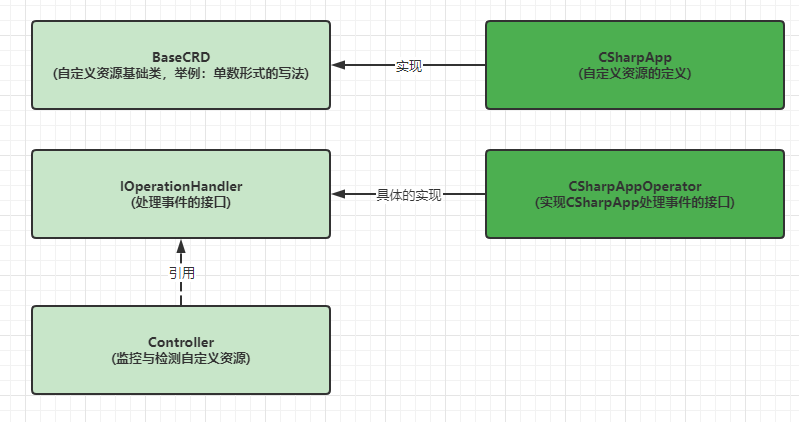 tn2>更多具体的请看代码地址(有注释):https://gitee.com/zuxiazijiahebo/k8s-plugs >### 部署CRD tn2>创建`crd.yaml`文件,并执行如下命令。 ```bash vim crd.yaml ``` ```yaml apiVersion: apiextensions.k8s.io/v1 kind: CustomResourceDefinition metadata: name: csharpapps.k8s.jijiechen.com spec: group: k8s.jijiechen.com versions: - name: v1alpha1 served: true storage: true schema: openAPIV3Schema: type: object description: "An application running csharp source" properties: spec: type: object required: - code properties: code: type: string replicas: type: integer format: int32 service: type: object description: "Service properties when the application provides network services" properties: port: type: integer format: int32 type: enum: - LoadBalancer - ClusterIP - NodePort type: string required: - port scope: Namespaced names: plural: csharpapps singular: csharpapp kind: CSharpApp shortNames: - csa ``` ```bash kubectl apply -f crd.yaml ``` tn2>运行我们的项目,这里为了方便我就在本地进行运行了;如果你需要在pod上运行请注意需要授权运行,可参考如下定义的ServiceAccess(注意:需要添加serviceAccountName字段): ```yaml kind: ServiceAccount apiVersion: v1 metadata: name: csharpapp-pod namespace: 你的名称空间 --- apiVersion: rbac.authorization.k8s.io/v1 kind: RoleBinding metadata: name: csharpapp-pod-operator-role namespace: 你的名称空间 roleRef: apiGroup: rbac.authorization.k8s.io kind: ClusterRole name: cluster-admin subjects: - kind: ServiceAccount name: csharpapp-pod namespace: 你的名称空间 ``` tn2>本地运行 ```bash dotnet run ``` 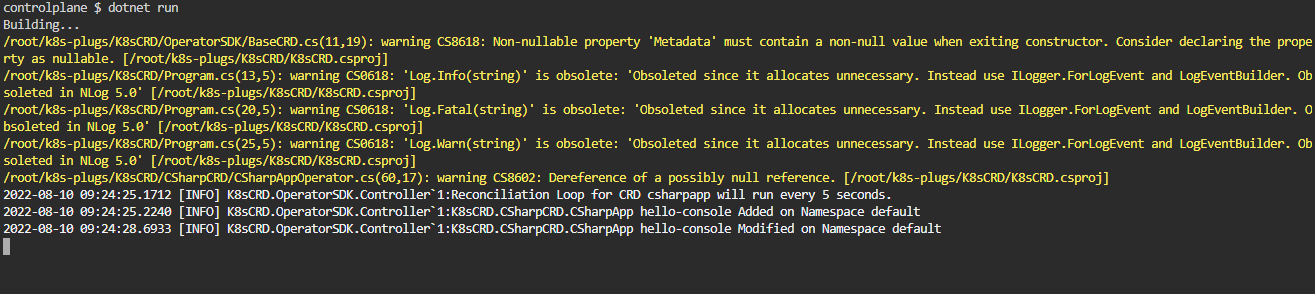 tn2>关于我们创建的容器,并不直接是`mcr.microsoft.com/dotnet/sdk:6.0`,而是通过一定的封装的,其执行的内容就是创建web项目,并替换Program.cs然后运行。 相关Dockerfile和run.sh如下: ```bash FROM mcr.microsoft.com/dotnet/sdk:6.0 COPY run.sh /run.sh ENTRYPOINT ["/bin/bash", "-f", "/run.sh"] ``` ```bash #!/bin/bash SRC=/etc/cs-source/Program.cs if [ ! -f "$SRC" ]; then echo "No C# source file detected." echo 1 fi WORK_DIR=/tmp/Proj$RANDOM mkdir -p $WORK_DIR cd $WORK_DIR dotnet new web cp $SRC $WORK_DIR/ dotnet run ``` >### 测试 tn2>接下来创建我们的测试`console.yaml` ```bash vim console.yaml ``` ```yaml apiVersion: k8s.jijiechen.com/v1alpha1 kind: CSharpApp metadata: name: hello-console namespace: default spec: code: | Console.WriteLine("Hello world from CSharp App"); Thread.Sleep(Timeout.Infinite); replicas: 2 ``` ```bash kubectl apply -f console.yaml kubectl get pod -w ```  tn2>由于我们的副本数量设置的是2,所以创建了两个pod,接下来我们查看其中一个pod的日志信息,发现已经将刚刚的代码给打印出来了。 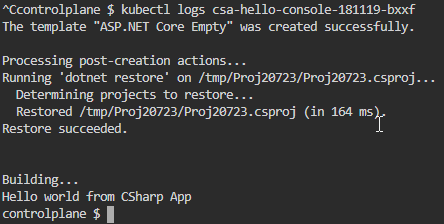 tn2>我们创建`web.yaml`来创建web项目测试,将它发布的类型设置为`LoadBalancer`,你们可以设置为默认的`ClusterService`。 ```bash vim web.yaml ``` ```yaml apiVersion: k8s.jijiechen.com/v1alpha1 kind: CSharpApp metadata: name: hello-web namespace: default spec: code: | var app = WebApplication.Create(args); app.MapGet("/", () => "Hello World!"); app.Run("http://*:80"); replicas: 2 service: type: LoadBalancer port: 80 ``` ```bash kubectl apply -f web.yaml ``` 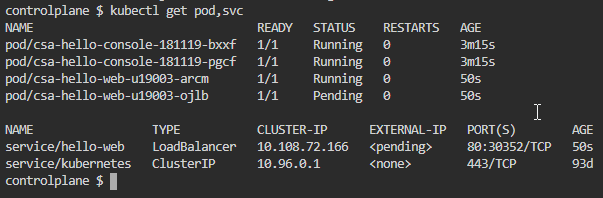 tn2>由于我这里LoadBalancer没有进行配置,所以我们可以直接访问cluster-ip也是没问题的。  tn2>可以看到访问没有任何问题。
欢迎加群讨论技术,1群:677373950(满了,可以加,但通过不了),2群:656732739
👈{{preArticle.title}}
👉{{nextArticle.title}}
评价
{{titleitem}}
{{titleitem}}
{{item.content}}
{{titleitem}}
{{titleitem}}
{{item.content}}
尘叶心繁
这一世以无限游戏为使命!
博主信息
排名
6
文章
6
粉丝
16
评论
8
文章类别
.net后台框架
177篇
linux
18篇
linux中cve
1篇
windows中cve
0篇
资源分享
10篇
Win32
3篇
前端
28篇
传说中的c
5篇
Xamarin
9篇
docker
15篇
容器编排
101篇
grpc
4篇
Go
15篇
yaml模板
1篇
理论
2篇
更多
Sqlserver
4篇
云产品
39篇
git
3篇
Unity
1篇
考证
2篇
RabbitMq
23篇
Harbor
1篇
Ansible
8篇
Jenkins
17篇
Vue
1篇
Ids4
18篇
istio
1篇
架构
2篇
网络
7篇
windbg
4篇
AI
19篇
threejs
2篇
人物
1篇
嵌入式
20篇
python
20篇
HuggingFace
8篇
pytorch
10篇
opencv
6篇
Halcon
5篇
最新文章
最新评价
{{item.articleTitle}}
{{item.blogName}}
:
{{item.content}}
关于我们
ICP备案 :
渝ICP备18016597号-1
网站信息:
2018-2024
TNBLOG.NET
技术交流:
群号656732739
联系我们:
contact@tnblog.net
欢迎加群
欢迎加群交流技术


 分类:
容器编排
分类:
容器编排
分类:
容器编排
分类:
容器编排