首页
视频
资源
登录
原
.net core 3.1 Identity Server4 (EntityFramework Core 配置)
5256
人阅读
2021/1/4 18:04
总访问:
2616736
评论:
0
收藏:
0
手机
分类:
Ids4
 >#.net core 3.1 Identity Server4 (EntityFramework Core 配置) [TOC] tn>在以前的时候我们所使用的数据库都是内存数据库`config.UseInMemoryDatabase("Memory");`,这样做的目的是为了方便测试,今天我们将`IdentityServer4`种的配置放到`Sqlserver`数据库中。 安装相关依赖包 ------------ ```bash dotnet add package IdentityServer4.EntityFramework dotnet add package Microsoft.EntityFrameworkCore.Design dotnet add package Microsoft.EntityFrameworkCore.SqlServer dotnet add package Microsoft.AspNetCore.Identity.EntityFrameworkCore ``` 添加配置 ------------ tn>在授权服务器中为数据库添加配置代码 ```csharp // 获取链接字符串 var connectionString = Configuration.GetConnectionString("DefaultConnection"); services.AddDbContext<AppDbContext>(config => { //将数据存入本地内存中 //config.UseInMemoryDatabase("Memory"); //存入到sqlserver中 config.UseSqlServer(connectionString); }); ......... var assembly = typeof(Startup).Assembly.GetName().Name; //迁移identity4至数据库中 services.AddIdentityServer() //验证cookie设置 .AddAspNetIdentity<IdentityUser>() .AddConfigurationStore(options => { options.ConfigureDbContext = b => b.UseSqlServer(connectionString, sql => sql.MigrationsAssembly(assembly)); }) .AddOperationalStore(options => { options.ConfigureDbContext = b => b.UseSqlServer(connectionString, sql => sql.MigrationsAssembly(assembly)); }) //开发人员签证凭证 .AddDeveloperSigningCredential(); ``` tn>在`appsettings.json`中添加`DefaultConnection`连接字符串。 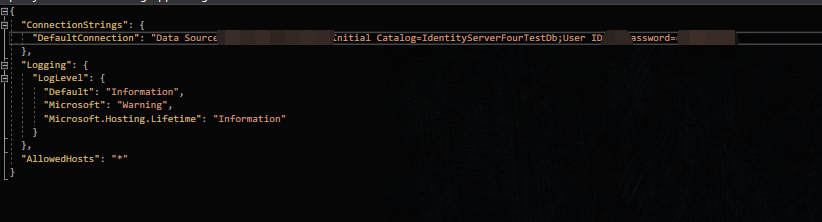 添加迁移 ------------ tn>您将需要在计算机上安装Entity Framework Core CLI。(如果有了就不用了) ```bash dotnet tool install --global dotnet-ef ``` tn>一旦将`IdentityServer`配置为使用`Entity Framework`,我们将需要生成一些迁移。 要创建迁移,请在IdentityServer项目目录中打开命令提示符,然后运行以下两个命令: ```bash dotnet ef migrations add InitialIdentityServerPersistedGrantDbMigration -c PersistedGrantDbContext -o Data/Migrations/IdentityServer/PersistedGrantDb dotnet ef migrations add InitialIdentityServerConfigurationDbMigration -c ConfigurationDbContext -o Data/Migrations/IdentityServer/ConfigurationDb ``` 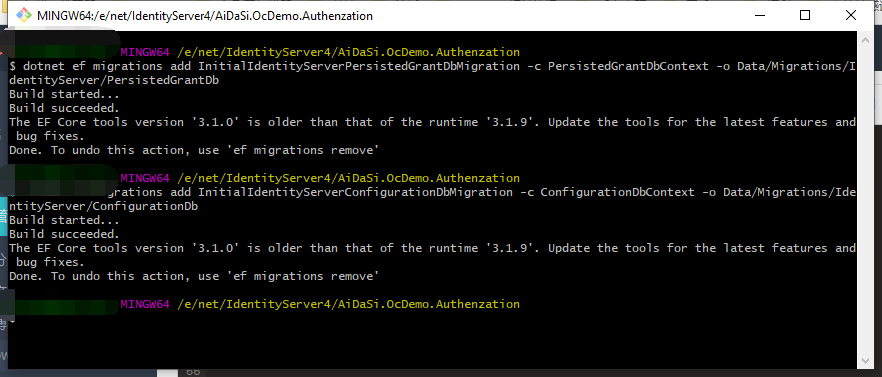 tn>然后在项目中就会看到相关的迁移 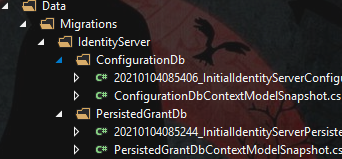 | 迁移名 | 作用 | | ------------ | ------------ | | ConfigurationDbContext | 用于配置数据,例如客户端,资源和范围 | | PersistedGrantDbContext | 用于临时操作数据,例如授权码和刷新令牌 | tn>最后迁移原有的数据库,并更新数据库。(注意这里呢,我都是放在了一个数据库里面,如果大家想方便分开放也是没问题的) ```bash dotnet ef migrations add init -c AppDbContext -o Data/Migrations/AppMigrations dotnet ef database update -c AppDbContext dotnet ef database update -c PersistedGrantDbContext dotnet ef database update -c ConfigurationDbContext ``` 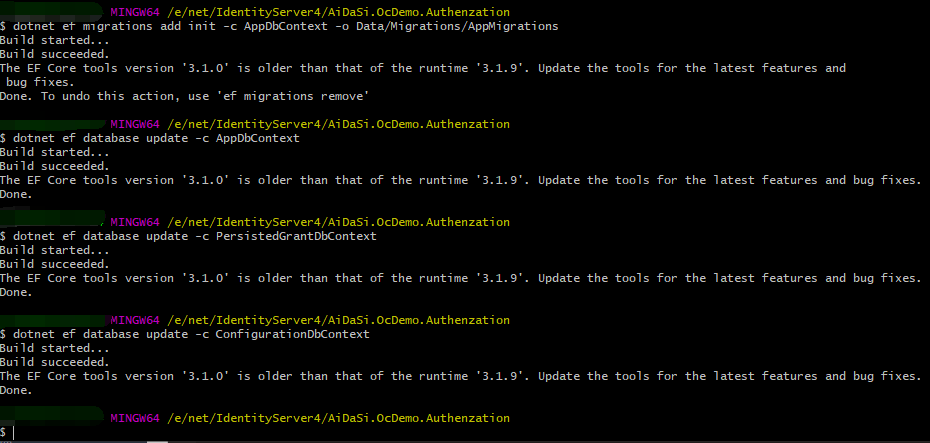 tn>到数据库里面去看看,嘻嘻嘻!有啦!有啦! 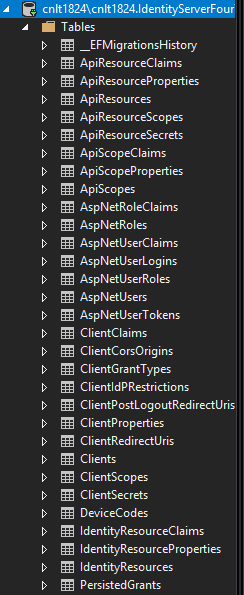 初始化数据库 ------------ tn>添加初始化数据库`IApplicationBuilder`的扩展  ```csharp public static class MiddlewareDatabaseExtension { public static IApplicationBuilder InitializeDatabase(this IApplicationBuilder builder) { using var scope = builder.ApplicationServices.GetService<IServiceScopeFactory>().CreateScope(); //下面是官网复制的 //加入数据库到id4中 scope.ServiceProvider.GetRequiredService<PersistedGrantDbContext>().Database.Migrate(); var context = scope.ServiceProvider.GetRequiredService<ConfigurationDbContext>(); //迁移一下 context.Database.Migrate(); ////添加 客户端,角色,资源 到数据库中 if (!context.Clients.Any()) { foreach (var client in Config.GetClients()) { context.Clients.Add(client.ToEntity()); } context.SaveChanges(); } if (!context.IdentityResources.Any()) { foreach (var resource in Config.GetIdentityResources()) { context.IdentityResources.Add(resource.ToEntity()); } context.SaveChanges(); } if (!context.ApiScopes.Any()) { foreach (var resource in Config.GetApiResources()) { context.ApiScopes.Add(resource.ToEntity()); } context.SaveChanges(); } return builder; } } ``` tn>然后在`Startup.cs`的`Configure`中运用该扩展 ```csharp // 初始化数据库 app.InitializeDatabase(); ``` tn>运行该测试一下,完全没问题!  tn>接着我们在数据库中查询一下,这些表。。。 >### 在数据库中查看表 tn>Client表(客户端) 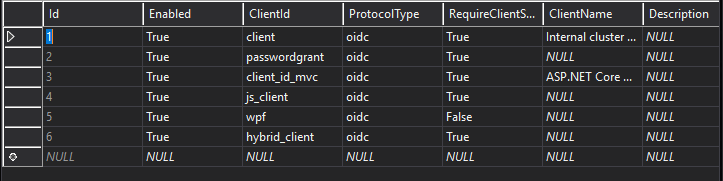 tn>AspNetUser表(用户) 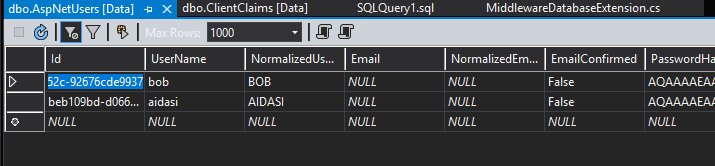 tn>ApiScopes表(接口) 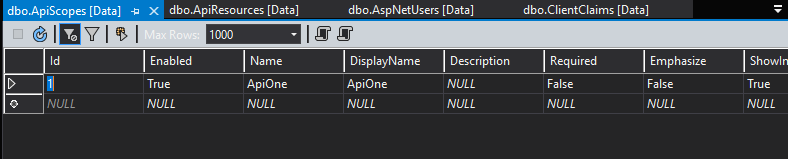 tn>IdentityRescource表(身份认证资源) 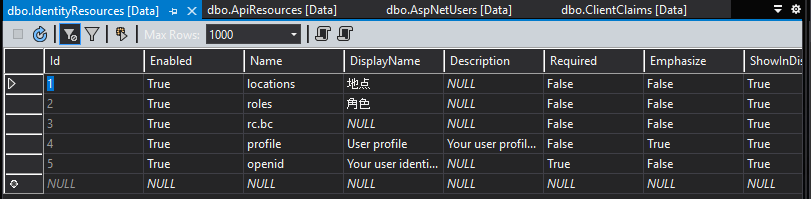 tn>更多关于表的,大家可以自己去数据库中看看... 最后祝大家新年快乐!元亨利贞! 关于.net6环境,AutoMapper 11.01不兼容 ToEntity 的问题。 ------------ tn2>请将AutoMapper版本调整为10.1.1,AutoMapper.Extensions.Microsoft.Dependen版本调整为8.1.1。 
欢迎加群讨论技术,1群:677373950(满了,可以加,但通过不了),2群:656732739
👈{{preArticle.title}}
👉{{nextArticle.title}}
评价
{{titleitem}}
{{titleitem}}
{{item.content}}
{{titleitem}}
{{titleitem}}
{{item.content}}
尘叶心繁
这一世以无限游戏为使命!
博主信息
排名
6
文章
6
粉丝
16
评论
8
文章类别
.net后台框架
168篇
linux
17篇
linux中cve
1篇
windows中cve
0篇
资源分享
10篇
Win32
3篇
前端
28篇
传说中的c
4篇
Xamarin
9篇
docker
15篇
容器编排
101篇
grpc
4篇
Go
15篇
yaml模板
1篇
理论
2篇
更多
Sqlserver
4篇
云产品
39篇
git
3篇
Unity
1篇
考证
2篇
RabbitMq
23篇
Harbor
1篇
Ansible
8篇
Jenkins
17篇
Vue
1篇
Ids4
18篇
istio
1篇
架构
2篇
网络
7篇
windbg
4篇
AI
18篇
threejs
2篇
人物
1篇
嵌入式
2篇
python
13篇
HuggingFace
8篇
pytorch
9篇
opencv
6篇
Halcon
1篇
最新文章
最新评价
{{item.articleTitle}}
{{item.blogName}}
:
{{item.content}}
关于我们
ICP备案 :
渝ICP备18016597号-1
网站信息:
2018-2024
TNBLOG.NET
技术交流:
群号656732739
联系我们:
contact@tnblog.net
欢迎加群
欢迎加群交流技术


 分类:
Ids4
分类:
Ids4
分类:
Ids4
分类:
Ids4