TNBLOG
首页
博客
视频
资源
问答
猿趣
手机
关于
搜索
收藏
便签
笔记
消息
创作
登录
剑轩
故如虹,知恩;故如月,知明
博主信息
排名
6
文章
6
粉丝
16
评论
8
文章类别
CSS
15篇
微服务
41篇
Git
14篇
.NET
102篇
移动开发
33篇
软件架构
23篇
.NET Core
119篇
.NET MVC
11篇
英语
3篇
随笔
86篇
Bootstrap
3篇
Redis
21篇
编辑器
10篇
Js相关
15篇
虚拟化
8篇
更多
Oracle
7篇
Python
14篇
数据库
26篇
EF
17篇
微信
3篇
前端
151篇
消息队列
6篇
docker
41篇
多线程
1篇
Java
4篇
软件基础
2篇
C++
2篇
WCF
7篇
Linux
7篇
nginx
5篇
K8S
9篇
ABP
2篇
最新文章
最新评价
{{item.articleTitle}}
{{item.blogName}}
:
{{item.content}}
关于我们
ICP备案 :
渝ICP备18016597号-1
网站信息:
2018-2024
TNBLOG.NET
技术交流:
群号656732739
联系我们:
contact@tnblog.net
欢迎加群
欢迎加群交流技术
原
python操作word,自动化办公
7726
人阅读
2020/8/7 15:01
总访问:
3920832
评论:
2
收藏:
0
手机
分类:
Python
[TOC] ### 安装依赖: ``` pip install requests pip install python-docx pip install fake-useragent ``` tn2>说一下使用的版本: requests:2.28.1 python-docx:0.8.11 fake-useragent:0.1.11 ### 简单的写入一点内容: ``` import docx file=docx.Document() #创建内存中的word文档对象 file.add_paragraph("窗前明月光") #写入若干段落 file.add_paragraph("疑是地上霜") file.add_paragraph("举头望明月") file.add_paragraph("低头思故乡") file.save("E:\静夜思.docx") #保存才能看到结果 ``` ### 添加的时候可以写入样式,表格等: ``` #插入有序列表,段落的前面会有序号123 doc2.add_paragraph('把冰箱门打开',style='List Number') doc2.add_paragraph('把大象装进去',style='List Number') doc2.add_paragraph('把冰箱门关上',style='List Number') #插入无序列表,段落的前面没有序号 doc2.add_paragraph('AA',style='List Bullet') doc2.add_paragraph('BB',style='List Bullet') doc2.add_paragraph('CC',style='List Bullet') #插入一个6行6列的表格 table=doc2.add_table(rows=6,cols=6,style='Table Grid') for i in range(0,6): for j in range(0,6): table.cell(i,j).text="第{i}行{j}列".format(i=i+1,j=j+1) #插入照片 doc2.add_picture('FLAMING MOUNTAIN.JPG',width=docx.shared.Inches(5)) ``` ### 添加段落的样式有这么多可以选择的,具体的效果大家可以试试: ``` Normal Body Text Body Text 2 Body Text 3 Caption Heading 1 Heading 2 Heading 3 Heading 4 Heading 5 Heading 6 Heading 7 Heading 8 Heading 9 Intense Quote List List 2 List 3 List Bullet List Bullet 2 List Bullet 3 List Continue List Continue 2 List Continue 3 List Number List Number 2 List Number 3 List Paragraph Macro Text No Spacing Quote Subtitle TOCHeading Title ``` 段落样式,表格样式等官方文档: https://python-docx.readthedocs.io/en/latest/user/styles-understanding.html ### 设置页眉 ``` file=docx.Document() #创建内存中的word文档对象 head=file.sections[0].header head.paragraphs[0].text="Left Text\tCenter Text\tRight Text" head.paragraphs[0].style =file.styles["Header"] head.is_linked_to_previous=False ``` #### 设置页眉的距离 有些毕业论文或者公文之类的,会有要求页眉距文本顶端的距离是多少多少,所以也写一下,怎么设置页眉距离 ``` doc = Document('1.docx') doc.sections[0].header_distance = Cm(10) doc.save('1.docx') ``` #### 设置奇偶数页页眉 ``` doc = Document('1.docx') doc.settings.odd_and_even_pages_header_footer = True doc.sections[0].even_page_header.paragraphs[0].text = "这是偶数页页眉" doc.sections[0].header.paragraphs[0].text = "这是奇数页页眉" doc.save('1.docx') ``` #### 设置页眉的方向 先引入对应的内容 ``` from docx.enum.text import WD_PARAGRAPH_ALIGNMENT #引入-设置对其方式 ``` 然后在设置 ``` head.paragraphs[0].alignment = WD_PARAGRAPH_ALIGNMENT.RIGHT#靠右 head.paragraphs[0].alignment = WD_PARAGRAPH_ALIGNMENT.CENTER#居中 ``` #### 页脚的设置基本是一样的,看看这样的 ``` footer = document.sections[0].footer # 获取第一个节的页脚 paragraph = footer.paragraphs[0] # 获取页脚的第一个段落 paragraph.add_run('')#添加内容 paragraph.alignment = WD_PARAGRAPH_ALIGNMENT.CENTER#居中 ``` 设置页眉的官方文档: https://python-docx.readthedocs.io/en/latest/user/hdrftr.html ### 设置字体样式(字体与大小) ``` from docx.shared import Pt file=docx.Document() #创建内存中的word文档对象 #设置字体样式(字体大小与) mystyle = file.styles["Header"] font = mystyle.font font.size = Pt(10.5) font.name = '宋体' head.paragraphs[0].style = mystyle ``` 其中字号与数字的对应如下: >初号=42磅 小初=36磅 一号=26磅 小一=24磅?二号=22磅 小二=18磅 三号=16磅 小三=15磅?四号=14磅 小四=12磅 五号=10.5磅 小五=9磅?六号=7.5磅 小六=6.5磅 七号=5.5磅 八号=5磅? tn> 注意设置中文字体的时候直接是不行的 需要使用如下的写法,两个一起用 ``` #这里需要引入一个qn from docx.oxml.ns import qn mystyle = file.styles["Normal"] font = mystyle.font font.size = Pt(10.5) font.name = u'宋体' font._element.rPr.rFonts.set(qn('w:eastAsia'), u'宋体') head.paragraphs[0].style = mystyle ``` 当然如果想全局设置字体的话可以这样做 ``` from docx.oxml.ns import qn document.styles['Normal'].font.name = u'宋体' document.styles['Normal']._element.rPr.rFonts.set(qn('w:eastAsia'), u'宋体') ``` >docx内置的样式都可以通过document.styles取到。 正文是Normal, 标题样式根据标题声明的基本,分别从Heading 1 到Heading 9, 另外还有table、list等各种word对应的样式。可以通过遍历document.styles查看。 ### 标题与字体 ``` # 导入库 from docx import Document from docx.shared import Pt from docx.shared import Inches from docx.oxml.ns import qn from docx.shared import RGBColor # 新建空白文档 doc1 = Document() # 新增文档标题 doc1.add_heading('如何使用 Python 创建 Word',0) # 创建段落描述 doc1.add_paragraph('我们平时使用 Word 用来做文章的处理,可能没想过它可以用 Python 生成,下面我们就介绍具体如何操作……') # 创建一级标题 doc1.add_heading('安装 python-docx 库',1) # 创建段落描述 doc1.add_paragraph('现在开始我们来介绍如何安装 python-docx 库,具体需要以下两步操作:') # 创建二级标题 doc1.add_heading('第一步:安装 Python',2) # 创建段落,添加文档内容 paragraph = doc1.add_paragraph('这是第一步的安装描述!') # 段落中增加文字,并设置字体字号 run = paragraph.add_run('(注意:这里设置了字号为20)') run.font.size = Pt(20) # 设置英文字体 run = doc1.add_paragraph('这里设置英文字体:').add_run('This Font is Times New Roman ') run.font.name = 'Times New Roman' # 设置中文字体 run = doc1.add_paragraph('这里设置中文字体:').add_run('当前字体为黑体') run.font.name='黑体' r = run._element r.rPr.rFonts.set(qn('w:eastAsia'), '黑体') # 设置斜体 run = doc1.add_paragraph('这段设置:').add_run('文字的是斜体 ') run.italic = True # 设置粗体 run = doc1.add_paragraph('这段再设置:').add_run('这里设置粗体').bold = True # 设置字体带下划线 run = doc1.add_paragraph('这段为下划线:').add_run('这里设置带下划线').underline = True # 设置字体颜色 run = doc1.add_paragraph('这段字体为红色:').add_run('这里设置字体为红色') run.font.color.rgb = RGBColor(0xFF, 0x00, 0x00) # 增加引用 doc1.add_paragraph('axj', style='Intense Quote') # 保存文件 doc1.save('myword.docx') ``` 官方文档: https://python-docx.readthedocs.io/en/latest/user/styles-using.html ### 设置段落行高与对齐方式等 对齐方式修改 ``` from docx.enum.text import WD_ALIGN_PARAGRAPH paragraph.alignment=WD_ALIGN_PARAGRAPH.CENTER # 居中对齐 ``` > paragraph.alignment=对齐方式,可选的对齐方式:LEFT、CENTER、RIGHT、JUSTIFY、DISTRIBUTE、JUSTIFY_MED、JUSTIFY_HI、JUSTIFY_LOW、THAI_JUSTIFY,具体的效果自己尝试 行间距设置 ``` paragraph.paragraph_format.line_spacing=2.0 # 修改行间距 ``` >使用paragraph.paragraph_format.line_spacing=2.0的方法,修改行间距,使用浮点数,2.0就表示两倍行间距! 修改段落间距 ``` paragraph.paragraph_format.space_before=Pt(12) paragraph.paragraph_format.space_after=Pt(10) ``` > 修改段前和段后间距,使用以上代码。Pt(12)表示12磅 注意设置了行间距后要把:在相同样式的段落间不添加空格勾勾去掉才能起作用,不然会有问题的 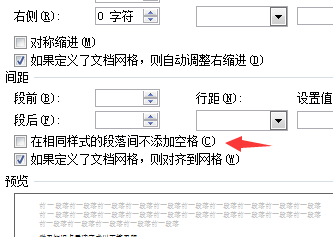 <br/> tn> 设置样式这些还没有玩得很转,不然配合python强大的爬虫能力真的可以减少好多工作量 <br/> ### 其他的可以参考一下官方文档 https://python-docx.readthedocs.io/en/latest/
欢迎加群讨论技术,1群:677373950(满了,可以加,但通过不了),2群:656732739
👈{{preArticle.title}}
👉{{nextArticle.title}}
评价
{{titleitem}}
{{titleitem}}
{{item.content}}
{{titleitem}}
{{titleitem}}
{{item.content}}


 分类:
Python
分类:
Python
分类:
Python
分类:
Python